JavaFXطريقة وضع محتوى النافذة في TilePane
المثال التالي يعلمك طريقة إنشاء كائن من الكلاس TilePane و وضعه كـ Root Node.
لاحظ أنه إفتراضياً تم ترتيب الأشياء بشكل أفقي في الأعلى من جهة اليسار, و عند تصغير النافذة بالعرض سيتم إظهار الأشياء على سطر جديد عند الحاجة.
مثال
import javafx.application.Application; import javafx.scene.Scene; import javafx.stage.Stage; import javafx.scene.control.Button; import javafx.scene.layout.TilePane; public class Main extends Application { public void start(Stage stage) { // في النافذة Root Node و الذي ننوي جعله الـ TilePane هنا قمنا بإنشاء كائن من الكلاس TilePane root = new TilePane(); // root هنا قمنا بإنشاء جميع الأشياء التي سنضيفها في الكائن Button button1 = new Button("Monday"); Button button2 = new Button("Tuesday"); Button button3 = new Button("Wednesday"); Button button4 = new Button("Thursday"); Button button5 = new Button("Friday"); Button button6 = new Button("Saturday"); Button button7 = new Button("Sunday"); // root في الكائن button7 و button6 و button5 و button4 و button3 و button2 و button1 هنا قمنا بإضافة الكائنات root.getChildren().addAll(button1, button2, button3, button4, button5, button6, button7); // فيها و تحديد حجمها Node كأول root هنا قمنا بإنشاء محتوى النافذة مع تعيين الكائن Scene scene = new Scene(root, 350, 250); // هنا وضعنا عنوان للنافذة stage.setTitle("JavaFX TilePane"); // أي وضعنا محتوى النافذة الذي قمنا بإنشائه للنافذة .stage في كائن الـ scene هنا وضعنا كائن الـ stage.setScene(scene); // هنا قمنا بإظهار النافذة stage.show(); } // هنا قمنا بتشغيل التطبيق public static void main(String[] args) { launch(args); } }
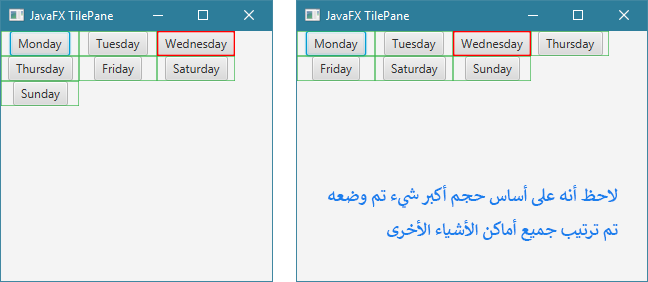
ستظهر لك النافذة التالية عند التشغيل.
ببطئ قم بتكبير حجم النافذة و تصغيرها بواسطة الفأرة لتفهم أكثر كيف تم ترتيب العناصر.