Programming Basics SQL HTML CSS JavaScript Python C++ Java JavaFX Swing Problem Solving English English Conversations Computer Fundamentals Learn Typing

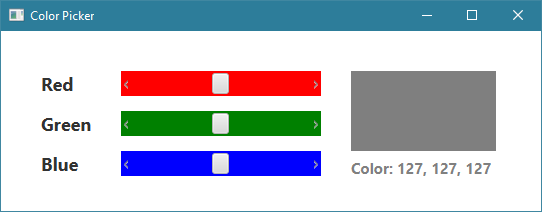
JavaFXطريقة إنشاء برنامج لإختيار الألوان Color Picker بنظام RGB

في هذا الدرس ستتعلم طريقة إنشاء برنامج لإختيار الألوان ( Color Picker ) بنظام RGB باستخدام JavaFX.

java javafx color picker source code تحميل كود برنامج إختيار الألوان في جافا

⇓ تحميل البرنامج ⇓ تحميل المشروع كاملاً


كود البرنامج

Main.java
import javafx.application.Application;
import javafx.beans.value.ChangeListener;
import javafx.beans.value.ObservableValue;
import javafx.geometry.Orientation;
import javafx.scene.Group;
import javafx.scene.Scene;
import javafx.scene.control.Label;
import javafx.scene.control.ScrollBar;
import javafx.scene.paint.Color;
import javafx.scene.shape.Rectangle;
import javafx.stage.Stage;
public class Main extends Application {
// هنا قمنا بتعريف الأشياء التي سيتم وضعها في النافذة
ScrollBar redScroller;
ScrollBar greenScroller;
ScrollBar blueScroller;
Label redLabel;
Label greenLabel;
Label blueLabel;
Rectangle selectedColorShape;
Label selectedColorLabel;
Color color = Color.rgb(127, 127, 127, 1);
// blueScroller و greenScroller ,redScroller هنا قمنا بتعريف دالة ترجع نص يمثل درجة اللون المختارة في الكائنات
public String getColorValue() {
return "Color: " + (int)redScroller.getValue() + ", " + (int)greenScroller.getValue() + ", "+ (int)blueScroller.getValue();
}
@Override
public void start(Stage stage) {
// هنا قمنا بإنشاء جميع الأشياء التي سنضيفها في النافذة
redLabel = new Label("Red");
greenLabel = new Label("Green");
blueLabel = new Label("Blue");
redScroller = new ScrollBar();
greenScroller = new ScrollBar();
blueScroller = new ScrollBar();
selectedColorShape = new Rectangle();
selectedColorLabel = new Label();
// ( أصغير قيمة فيه, أكبر قيمة فيه, القيمة الإفتراضية, يظهر بشكل أفقي ) redScroller هنا قمنا بتحديد خصائص الكائن
redScroller.setBlockIncrement(1);
redScroller.setMin(0);
redScroller.setMax(255);
redScroller.setValue(127);
redScroller.setOrientation(Orientation.HORIZONTAL);
// ( أصغير قيمة فيه, أكبر قيمة فيه, القيمة الإفتراضية, يظهر بشكل أفقي ) greenScroller هنا قمنا بتحديد خصائص الكائن
greenScroller.setBlockIncrement(1);
greenScroller.setMin(0);
greenScroller.setMax(255);
greenScroller.setValue(127);
greenScroller.setOrientation(Orientation.HORIZONTAL);
// ( أصغير قيمة فيه, أكبر قيمة فيه, القيمة الإفتراضية, يظهر بشكل أفقي ) blueScroller هنا قمنا بتحديد خصائص الكائن
blueScroller.setBlockIncrement(1);
blueScroller.setMin(0);
blueScroller.setMax(255);
blueScroller.setValue(127);
blueScroller.setOrientation(Orientation.HORIZONTAL);
// selectedColorLabel كنص للكائن getColorValue() هنا قمنا بوضع النص الذي ترجعه الدالة
selectedColorLabel.setText(getColorValue());
// هنا قمنا بتحديد حجم كل شيء سيتم إضافته في الحاوية الرئيسية التي سنضعها في النافذة
redLabel.setPrefSize(60, 25);
greenLabel.setPrefSize(60, 25);
blueLabel.setPrefSize(60, 25);
redScroller.setPrefSize(200, 25);
greenScroller.setPrefSize(200, 25);
blueScroller.setPrefSize(200, 25);
selectedColorShape.setWidth(145);
selectedColorShape.setHeight(80);
selectedColorLabel.setPrefSize(145, 25);
// هنا قمنا بتحديد مكان ظهور كل شيء سيتم إضافته في الحاوية الرئيسية التي سنضعها في النافذة
redLabel.setTranslateX(40);
redLabel.setTranslateY(40);
greenLabel.setTranslateX(40);
greenLabel.setTranslateY(80);
blueLabel.setTranslateX(40);
blueLabel.setTranslateY(120);
redScroller.setTranslateX(120);
redScroller.setTranslateY(40);
greenScroller.setTranslateX(120);
greenScroller.setTranslateY(80);
blueScroller.setTranslateX(120);
blueScroller.setTranslateY(120);
selectedColorShape.setTranslateX(350);
selectedColorShape.setTranslateY(40);
selectedColorLabel.setTranslateX(350);
selectedColorLabel.setTranslateY(125);
// هنا قمنا يتعديل تصميم كل شيء سيتم إضافته في الحاوية الرئيسية التي سنضعها في النافذة
redLabel.setStyle("-fx-font-weight: bold; -fx-font-size: 18px");
greenLabel.setStyle("-fx-font-weight: bold; -fx-font-size: 18px");
blueLabel.setStyle("-fx-font-weight: bold; -fx-font-size: 18px");
selectedColorLabel.setStyle("-fx-font-weight: bold; -fx-font-size: 15px; -fx-text-fill: gray");
redScroller.setStyle("-fx-background-color: red");
greenScroller.setStyle("-fx-background-color: green");
blueScroller.setStyle("-fx-background-color: blue");
// color هو اللون الذي يمثله الكائن - selectedColorShape هنا قمنا بجعل لون خلفية المربع - الكائن
selectedColorShape.setFill(color);
// أي كلما تم تحريك أي واحد فيهم ,ScrollBar هنا وضعنا الأوامر التي نريد تنفيذها عند تغيير قيمة أي
ChangeListener myListener = (ChangeListener) (ObservableValue observable, Object oldValue, Object newValue) -> {
// blue و green ,red بالترتيب في المتغيرات blueScroller و greenScroller ,redScroller في البداية بتخزين قيم الكائنات
int red = (int) redScroller.getValue();
int green = (int) greenScroller.getValue();
int blue = (int) blueScroller.getValue();
// color و خزناها في الكائن blue و green ,red بعدها قمنا بإنشاء درجة لون جديدة بناءاَ على القيم المخزنة في المتغيرات
color = Color.rgb(red, green, blue, 1);
// selectedColorShape كخلفية للكائن color بعدها وضعنا درجة اللون المخزنة في الكائن
selectedColorShape.setFill(color);
// selectedColorLabel كنص للكائن color بعدها سيتم وضع درجة اللون المخزنة في الكائن
selectedColorLabel.setText(getColorValue());
};
// myListener سيتم تنفيذ الأوامر الموضوعة في الكائن blueScroller أو الكائن greenScroller أو الكائن redScroller هنا قلنا أنه عند تحريك الكائن
redScroller.valueProperty().addListener(myListener);
greenScroller.valueProperty().addListener(myListener);
blueScroller.valueProperty().addListener(myListener);
// في النافذة Root Node و الذي ننوي جعله الـ Group هنا قمنا بإنشاء كائن من الكلاس
Group root = new Group();
// هنا قمنا بإضافة جميع الأشياء التي قمنا بإنشائها في النافذة
root.getChildren().add(redLabel);
root.getChildren().add(greenLabel);
root.getChildren().add(blueLabel);
root.getChildren().add(redScroller);
root.getChildren().add(greenScroller);
root.getChildren().add(blueScroller);
root.getChildren().add(selectedColorShape);
root.getChildren().add(selectedColorLabel);
// فيها و تحديد حجمها Node كأول root هنا قمنا بإنشاء محتوى النافذة مع تعيين الكائن
Scene scene = new Scene(root, 540, 180);
// هنا وضعنا عنوان للنافذة
stage.setTitle("Color Picker");
// أي وضعنا محتوى النافذة الذي قمنا بإنشائه للنافذة .stage في كائن الـ scene هنا وضعنا كائن الـ
stage.setScene(scene);
// هنا قمنا بإظهار النافذة
stage.show();
}
// هنا قمنا بتشغيل التطبيق
public static void main(String[] args) {
launch(args);
}
}
import javafx.application.Application; import javafx.beans.value.ChangeListener; import javafx.beans.value.ObservableValue; import javafx.geometry.Orientation; import javafx.scene.Group; import javafx.scene.Scene; import javafx.scene.control.Label; import javafx.scene.control.ScrollBar; import javafx.scene.paint.Color; import javafx.scene.shape.Rectangle; import javafx.stage.Stage; public class Main extends Application { // هنا قمنا بتعريف الأشياء التي سيتم وضعها في النافذة ScrollBar redScroller; ScrollBar greenScroller; ScrollBar blueScroller; Label redLabel; Label greenLabel; Label blueLabel; Rectangle selectedColorShape; Label selectedColorLabel; Color color = Color.rgb(127, 127, 127, 1); // blueScroller و greenScroller ,redScroller هنا قمنا بتعريف دالة ترجع نص يمثل درجة اللون المختارة في الكائنات public String getColorValue() { return "Color: " + (int)redScroller.getValue() + ", " + (int)greenScroller.getValue() + ", "+ (int)blueScroller.getValue(); } @Override public void start(Stage stage) { // هنا قمنا بإنشاء جميع الأشياء التي سنضيفها في النافذة redLabel = new Label("Red"); greenLabel = new Label("Green"); blueLabel = new Label("Blue"); redScroller = new ScrollBar(); greenScroller = new ScrollBar(); blueScroller = new ScrollBar(); selectedColorShape = new Rectangle(); selectedColorLabel = new Label(); // ( أصغير قيمة فيه, أكبر قيمة فيه, القيمة الإفتراضية, يظهر بشكل أفقي ) redScroller هنا قمنا بتحديد خصائص الكائن redScroller.setBlockIncrement(1); redScroller.setMin(0); redScroller.setMax(255); redScroller.setValue(127); redScroller.setOrientation(Orientation.HORIZONTAL); // ( أصغير قيمة فيه, أكبر قيمة فيه, القيمة الإفتراضية, يظهر بشكل أفقي ) greenScroller هنا قمنا بتحديد خصائص الكائن greenScroller.setBlockIncrement(1); greenScroller.setMin(0); greenScroller.setMax(255); greenScroller.setValue(127); greenScroller.setOrientation(Orientation.HORIZONTAL); // ( أصغير قيمة فيه, أكبر قيمة فيه, القيمة الإفتراضية, يظهر بشكل أفقي ) blueScroller هنا قمنا بتحديد خصائص الكائن blueScroller.setBlockIncrement(1); blueScroller.setMin(0); blueScroller.setMax(255); blueScroller.setValue(127); blueScroller.setOrientation(Orientation.HORIZONTAL); // selectedColorLabel كنص للكائن getColorValue() هنا قمنا بوضع النص الذي ترجعه الدالة selectedColorLabel.setText(getColorValue()); // هنا قمنا بتحديد حجم كل شيء سيتم إضافته في الحاوية الرئيسية التي سنضعها في النافذة redLabel.setPrefSize(60, 25); greenLabel.setPrefSize(60, 25); blueLabel.setPrefSize(60, 25); redScroller.setPrefSize(200, 25); greenScroller.setPrefSize(200, 25); blueScroller.setPrefSize(200, 25); selectedColorShape.setWidth(145); selectedColorShape.setHeight(80); selectedColorLabel.setPrefSize(145, 25); // هنا قمنا بتحديد مكان ظهور كل شيء سيتم إضافته في الحاوية الرئيسية التي سنضعها في النافذة redLabel.setTranslateX(40); redLabel.setTranslateY(40); greenLabel.setTranslateX(40); greenLabel.setTranslateY(80); blueLabel.setTranslateX(40); blueLabel.setTranslateY(120); redScroller.setTranslateX(120); redScroller.setTranslateY(40); greenScroller.setTranslateX(120); greenScroller.setTranslateY(80); blueScroller.setTranslateX(120); blueScroller.setTranslateY(120); selectedColorShape.setTranslateX(350); selectedColorShape.setTranslateY(40); selectedColorLabel.setTranslateX(350); selectedColorLabel.setTranslateY(125); // هنا قمنا يتعديل تصميم كل شيء سيتم إضافته في الحاوية الرئيسية التي سنضعها في النافذة redLabel.setStyle("-fx-font-weight: bold; -fx-font-size: 18px"); greenLabel.setStyle("-fx-font-weight: bold; -fx-font-size: 18px"); blueLabel.setStyle("-fx-font-weight: bold; -fx-font-size: 18px"); selectedColorLabel.setStyle("-fx-font-weight: bold; -fx-font-size: 15px; -fx-text-fill: gray"); redScroller.setStyle("-fx-background-color: red"); greenScroller.setStyle("-fx-background-color: green"); blueScroller.setStyle("-fx-background-color: blue"); // color هو اللون الذي يمثله الكائن - selectedColorShape هنا قمنا بجعل لون خلفية المربع - الكائن selectedColorShape.setFill(color); // أي كلما تم تحريك أي واحد فيهم ,ScrollBar هنا وضعنا الأوامر التي نريد تنفيذها عند تغيير قيمة أي ChangeListener myListener = (ChangeListener) (ObservableValue observable, Object oldValue, Object newValue) -> { // blue و green ,red بالترتيب في المتغيرات blueScroller و greenScroller ,redScroller في البداية بتخزين قيم الكائنات int red = (int) redScroller.getValue(); int green = (int) greenScroller.getValue(); int blue = (int) blueScroller.getValue(); // color و خزناها في الكائن blue و green ,red بعدها قمنا بإنشاء درجة لون جديدة بناءاَ على القيم المخزنة في المتغيرات color = Color.rgb(red, green, blue, 1); // selectedColorShape كخلفية للكائن color بعدها وضعنا درجة اللون المخزنة في الكائن selectedColorShape.setFill(color); // selectedColorLabel كنص للكائن color بعدها سيتم وضع درجة اللون المخزنة في الكائن selectedColorLabel.setText(getColorValue()); }; // myListener سيتم تنفيذ الأوامر الموضوعة في الكائن blueScroller أو الكائن greenScroller أو الكائن redScroller هنا قلنا أنه عند تحريك الكائن redScroller.valueProperty().addListener(myListener); greenScroller.valueProperty().addListener(myListener); blueScroller.valueProperty().addListener(myListener); // في النافذة Root Node و الذي ننوي جعله الـ Group هنا قمنا بإنشاء كائن من الكلاس Group root = new Group(); // هنا قمنا بإضافة جميع الأشياء التي قمنا بإنشائها في النافذة root.getChildren().add(redLabel); root.getChildren().add(greenLabel); root.getChildren().add(blueLabel); root.getChildren().add(redScroller); root.getChildren().add(greenScroller); root.getChildren().add(blueScroller); root.getChildren().add(selectedColorShape); root.getChildren().add(selectedColorLabel); // فيها و تحديد حجمها Node كأول root هنا قمنا بإنشاء محتوى النافذة مع تعيين الكائن Scene scene = new Scene(root, 540, 180); // هنا وضعنا عنوان للنافذة stage.setTitle("Color Picker"); // أي وضعنا محتوى النافذة الذي قمنا بإنشائه للنافذة .stage في كائن الـ scene هنا وضعنا كائن الـ stage.setScene(scene); // هنا قمنا بإظهار النافذة stage.show(); } // هنا قمنا بتشغيل التطبيق public static void main(String[] args) { launch(args); } }

الدورات

أدوات مساعدة

أقسام الموقع

دورات
مقالات كتب مشاريع أسئلة