JavaFXطريقة عرض البيانات في TableView
المثال التالي يعلمك طريقة عرض البيانات في TableView.
تذكر
عند استخدام TableView لعرض البيانات, فإن JavaFX تتوقع منك أن تقوم بتعريف كلاس خاص تضع فيه عدة خصائص تمثل أسماء و أنواع البيانات التي سيتم تخزينها في كل عامود فيه. كما أنها تجربك على تعريف دوال Setters و Getters مع إختيار التسميات الصحيحة المشتقة من أسماء الخصائص لأنها ستقوم باستدعائهم بشكل تلقائي عند ربط الجدول و أعمدته بهذا الكلاس.
الآن, بما أننا ننوي بناء جدول خاص لعرض المنتجات, سنقوم بتجهيز كلاس إسمه Product يمثل بيانات أي منتج سيتم عرضه في الجدول.
إذاً الكلاس Product سيحتوي على ثلاث خصائص و هي الإسم (name), السعر (price) و الكمية (quantity) مع دوال الـ Setters و الـ Getters التي تتيح الوصول لهذه الخصائص.
إنتبه: إن لم تقم بتعريف دوال الـ Setters و الـ Getters في الكلاس Product تماماً كما فعلنا فإنه لن يظهر لك أي بيانات في الجدول عند تشغيل البرنامج.
مثال
public class Product {

    String name;
    double price;
    int quantity;

    public Product() {
        this.name = "";
        this.price = 0.0;
        this.quantity = 0;
    }

    public Product(String name, double price, int quantity) {
        this.name = name;
        this.price = price;
        this.quantity = quantity;
    }

    public String getName() {
        return name;
    }

    public void setName(String name) {
        this.name = name;
    }

    public double getPrice() {
        return price;
    }

    public void setPrice(double price) {
        this.price = price;
    }

    public int getQuantity() {
        return quantity;
    }

    public void setQuantity(int quantity) {
        this.quantity = quantity;
    }

}
import javafx.application.Application; import javafx.collections.FXCollections; import javafx.collections.ObservableList; import javafx.scene.Group; import javafx.scene.Scene; import javafx.scene.control.TableColumn; import javafx.scene.control.TableView; import javafx.scene.control.cell.PropertyValueFactory; import javafx.stage.Stage; public class Main extends Application { public void start(Stage stage) { // يمثل الجدول الذي نريد إضافته في النافذة TableView هنا قمنا بإنشاء كائن من الكلاس TableView table = new TableView(); // يمثل مجموعة البيانات التي ستظهر في الجدول Observableهنا قمنا بإنشاء كائن من الكلاس // Product كل سطر في هذا الجدول يمثل كائن من الكلاس ObservableList<Product> data = FXCollections.observableArrayList( new Product("Laptop", 800.00, 3), new Product("Camera", 199.99, 12), new Product("Hard Disk", 79.99, 8), new Product("Projector", 240.55, 7), new Product("PC Screen", 120.00, 6), new Product("Speakers", 33.00, 10), new Product("Headphones", 12.50, 4), new Product("Microphone", 24.75, 5) ); // table تمثل الأعمدة التي سنضيفها في الكائن TableColumn هنا قمنا بإنشاء ثلاث كائنات TableColumn columnName = new TableColumn("Name"); TableColumn columnPrice = new TableColumn("Price ($)"); TableColumn columnQuantity = new TableColumn("Quantity"); // table هنا وضعنا الأعمدة الثلاثة في الكائن table.getColumns().addAll(columnName, columnPrice, columnQuantity); // table في الكائن data هنا قمنا بوضع بيانات الكائن table.setItems(data); // تم إضافته في الجدول Product الموجودة في كل كائن name سيُعرض فيه قيم الـ columnName هنا قلنا أن العامود columnName.setCellValueFactory( new PropertyValueFactory<>("name") ); // تم إضافته في الجدول Product الموجودة في كل كائن price سيُعرض فيه قيم الـ columnPrice هنا قلنا أن العامود columnPrice.setCellValueFactory( new PropertyValueFactory<>("price") ); // تم إضافته في الجدول Product الموجودة في كل كائن quantity سيُعرض فيه قيم الـ columnQuantity هنا قلنا أن العامود columnQuantity.setCellValueFactory( new PropertyValueFactory<>("quantity") ); // في النافذة table هنا قمنا بتحديد حجم الكائن table.setPrefSize(440, 300); // حتى نستغل كل الحجم الذي حجزناه له table هنا قمنا بتحديد عرض كل عامود بداخل الكائن columnName.setPrefWidth(144); columnPrice.setPrefWidth(144); columnQuantity.setPrefWidth(150); // في النافذة table هنا قمنا بتحديد مكان ظهور الكائن table.setTranslateX(10); table.setTranslateY(10); // في النافذة Root Node لأننا ننوي جعله الـ Group هنا قمنا بإنشاء كائن من الكلاس Group root = new Group(); // root في الكائن table هنا قمنا بإضافة الكائن root.getChildren().add(table); // فيها و تحديد حجمها Node كأول root هنا قمنا بإنشاء محتوى النافذة مع تعيين الكائن Scene scene = new Scene(root, 460, 320); // هنا وضعنا عنوان للنافذة stage.setTitle("JavaFX TableView"); // أي وضعنا محتوى النافذة الذي قمنا بإنشائه للنافذة .stage في كائن الـ scene هنا وضعنا كائن الـ stage.setScene(scene); // هنا قمنا بإظهار النافذة stage.show(); } // هنا قمنا بتشغيل التطبيق public static void main(String[] args) { launch(args); } }
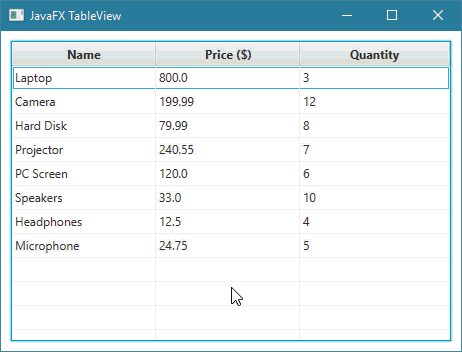
ستظهر لك النافذة التالية عند التشغيل.
كما تلاحظ, يمكنك التلاعب بحجم الأعمدة و تبديل أماكنهم و النقر على عنوان أي عامود حتى يتم عرض البيانات بالترتيب الأبجدي أو حسب قيمهم.