Swingالإستفادة من الـ JSplitPane في التطبيقات الفعلية
المثال التالي يعلمك طريقة وضع أي محتوى تريده في الـ Split Pane و إضافة Scroll Bar للأقسام أيضاً.
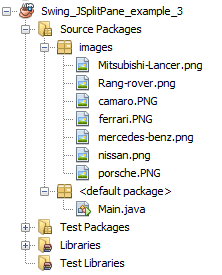
في البداية قمنا بإنشاء مجلد خاص لوضع الصور التي نريد عرضها في البرنامج كما في الصورة التالية.
بعدها قمنا بإنشاء كائن من الكلاس JSplitPane إسمه splitPane لتقسيم الـ Frame إلى قسمين.
وضعنا JScrollPane في القسم الأيمن و القسم الأيسر من الـ splitPane حتى يظهروا Scroll Bar في حال كان المحتوى الموضوع فيهما يحتاج إلى مساحة أكبر حتى يظهر.
في الـ JScrollPane الأيمن وضعنا JLabel و الذي سنضع فيه الصورة.
في الـ JScrollPane الأيسر وضعنا JList و التي سنضع فيها جميع أسماء الصور الموجودة في المجلد images.
في الأخير قلنا أن أي صورة يتم النقر على إسمها سيتم عرض محتواها كأيقونة للـ JLabel.
مثال
import javax.swing.JFrame; import javax.swing.JLabel; import javax.swing.JList; import javax.swing.DefaultListModel; import javax.swing.ImageIcon; import javax.swing.JScrollPane; import javax.swing.JSplitPane; import javax.swing.JOptionPane; import javax.swing.ListSelectionModel; import javax.swing.event.ListSelectionEvent; import javax.swing.event.ListSelectionListener; import java.io.File; public class Main { static JFrame frame = new JFrame("JSplitPane demo"); // Frame هنا قمنا بتعريف الـ static JLabel picture = new JLabel(); // Frame لعرض الصور في القسم الأيمن من الـ Label سنستخدم هذا الـ static DefaultListModel model = new DefaultListModel(); // لتخزين محتوى الـ model سنستخدم هذه الـ static J= new JList(model); // Frame التي سنضعها في القسم الأيسر من الـ هنا قمنا بتعريف الـ public static void main(String[] args) { frame.setSize(500, 320); // هنا قمنا بتحديد حجم النافذة. عرضها 500 و طولها 320 frame.setDefaultCloseOperation(JFrame.EXIT_ON_CLOSE); // هنا جعلنا زر الخروج من النافذة يغلق البرنامج // عند الحاجة Scroll Bar حتى يظهروا بداخل Scroll Pane بداخل picture و الـ هنا وضعنا كل الـ JScrollPaneScrollPane = new JScrollPane(list); JScrollPane pictureScrollPane = new JScrollPane(picture); // في القسم الأيمن pictureScrollPane في القسم الأيسر و الـScrollPane و وضعنا في الـ Split Pane هنا قمنا بتعريف الـ JSplitPane splitPane = new JSplitPane(JSplitPane.HORIZONTAL_SPLIT,ScrollPane, pictureScrollPane); // Split Pane أي قمنا بإنشاء JSplitPane هنا أنشأنا كائن من الكلاس splitPane.setDividerLocation(150); // splitPane في الـ Splitter هنا قمنا بتحديد موقع الـ splitPane.setOneTouchExpandable(true); // Splitter هنا قمنا بإضافة أسهم التحريك السريع على الـ splitPane.setContinuousLayout(true); // Splitter هنا قمنا بإخفاء اللون الأسود الذي يظهر عند تحريك الـ // model و وضعناها في الـ images هنا قمنا بجلب جميع أسماء الصور التي وضعناها في المجلد try { File rootFolder = new File("src/images"); String[] paths = rootFolder.list(); for (String path: paths) model.addElement(path); } catch (Exception e) { JOptionPane.showMessageDialog(null, "No Image found!", "Error", JOptionPane.ERROR_MESSAGE); } // هنا جعلنا المستخدم قادر على تحديد صورة واحدة من القائمة في كل مرة و جعلنا أول صورة محددة إفتراضياً .setSelectionMode(ListSelectionModel.SINGLE_SELECTION); .setSelectedIndex(0); // و عرضنا الصورة المحددة إفتراضياَ في الـ pictureScrollPane هنا جعلنا الصور تظهر في منتصف الـ picture.setHorizontalAlignment(JLabel.CENTER); picture.setIcon(new ImageIcon(Main.class.getResource("../images/"+list.getSelectedValue()))); // هنا قلنا أنه في كل مرة يقوم المستخدم بالنقر إسم الصورة, سيتم إظهارها له .addListSelectionListener(newSelectionListener() { public void valueChanged(ListSelectionEvent e) { picture.setIcon(new ImageIcon(Main.class.getResource("../images/"+list.getSelectedValue()))); } }); frame.add(splitPane); // لتقسيمها إلى قسمين أساسيين frame في الـ splitPane هنا أضفنا الـ frame.setVisible(true); // هنا جعلنا النافذة مرئية } }
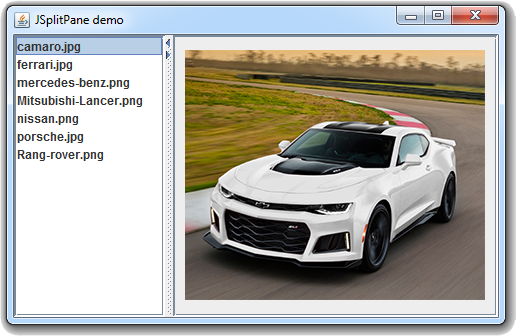
ستظهر لك النافذة التالية عند التشغيل.