Swingطريقة تغيير نوع و لون و حجم خط الـ JButton
المثال التالي يعلمك طريقة تغيير نوع و حجم و لون الخط لكائن الـ JButton.
مثال
import java.awt.Color;
import javax.swing.JFrame;
import javax.swing.JButton;
import java.awt.FlowLayout;
import java.awt.Font;

public class Main {

    public static void main(String[] args) {

        JFrame frame = new JFrame("JButton demo");              // أي قمنا بإنشاء نافذة مع وضع عنوان لها JFrame هنا أنشأنا كائن من الكلاس

        JButton button_1 = new JButton("Button 1");             // button_1 إسمه JButtonهنا قمنا بإنشاء
        JButton button_2 = new JButton("Button 2");             // button_2 إسمه JButtonهنا قمنا بإنشاء
        JButton button_3 = new JButton("Button 3");             // button_3 إسمه JButtonهنا قمنا بإنشاء

        Font newFont = new Font("Arial", Font.BOLD, 16);        // حجمه 16 Arial يمثل نوع خط عريض إسمه Font هنا أنشأنا كائن من الكلاس

        button_1.setFont(newFont);                              // newFont يستخدم الـ button_1 هنا جعلنا الـ
        button_1.setForeground(Color.cyan);                     // أزرق فاتح button_1 هنا جعلنا لون خط
        button_1.setBackground(Color.darkGray);                 // رمادي غامق button_1 هنا جعلنا لون خلفية الــ

        button_2.setFont(newFont);                              // newFont يستخدم الـ button_2 هنا جعلنا الـ
        button_2.setForeground(Color.red);                      // أحمر button_2 هنا جعلنا لون خط
        button_2.setBackground(Color.darkGray);                 // رمادي غامق button_2 هنا جعلنا لون خلفية الــ

        button_3.setFont(newFont);                              // newFont يستخدم الـ button_3 هنا جعلنا الـ
        button_3.setForeground(Color.orange);                   // برتقالي button_3 هنا جعلنا لون خط
        button_3.setBackground(Color.darkGray);                 // رمادي غامق button_3 هنا جعلنا لون خلفية الــ

        frame.add(button_1);                                    // frame في الـ Button_1 هنا أضفنا الـ
        frame.add(button_2);                                    // frame في الـ Button_2 هنا أضفنا الـ
        frame.add(button_3);                                    // frame في الـ Button_3 هنا أضفنا الـ

        frame.setSize(300, 250);                                // هنا قمنا بتحديد حجم النافذة. عرضها 300 و طولها 250
        frame.setDefaultCloseOperation(JFrame.EXIT_ON_CLOSE);   // هنا جعلنا زر الخروج من النافذة يغلق البرنامج
        frame.setLayout(new FlowLayout());                      // حتى نجعل الأشياء التي نضيفها في النافذة تترب وراء بعضها و في وسط النافذة FlowLayout إستخدمنا الـ
        frame.setVisible(true);                                 // هنا جعلنا النافذة مرئية

    }

}
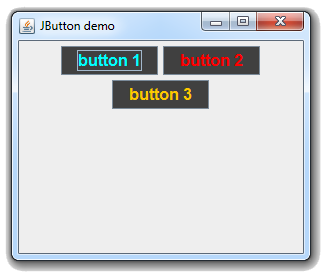
ستظهر لك النافذة التالية عند التشغيل.