Swingطريقة تنفيذ أوامر عند النقر على JButton
المثال التالي يعلمك طريقة تنفيذ أوامر عند النقر على الـ Button.
مثال
import javax.swing.JFrame; import javax.swing.JButton; import javax.swing.JLabel; import java.awt.FlowLayout; import java.awt.event.ActionEvent; import java.awt.event.ActionListener; public class Main { static JFrame frame = new JFrame("JButton demo"); // أي قمنا بإنشاء نافذة مع وضع عنوان لها JFrame هنا أنشأنا كائن من الكلاس static JButton plus_button = new JButton("+1"); // plus_button إسمه Button هنا أنشأنا static JButton minus_button = new JButton("-1"); // minus_button إسمه Button هنا أنشأنا static JLabel label = new JLabel("0"); // label إسمه Label هنا أنشأنا static int counter = 0; // سنستخدم هذه المتغير كعداد public static void main(String[] args) { plus_button.addActionListener(new ActionListener() { // plus_button هنا نضع الأوامر التي نريد تنفيذها عند النقر على الزر public void actionPerformed(ActionEvent e) { label.setText("" + (++counter)); // plus_button عند النقر على الـ label واحداً ثم توضع كنص للـ counter ستزيد قيمة المتغير } }); minus_button.addActionListener(new ActionListener() { // minus_button هنا نضع الأوامر التي نريد تنفيذها عند النقر على الزر public void actionPerformed(ActionEvent e) { label.setText("" + (--counter)); // minus_button عند النقر على الـ label واحداً ثم توضع كنص للـ counter ستنقص قيمة المتغير } }); frame.add(minus_button); // frame في الـ minus_button هنا أضفنا الـ frame.add(label); // frame في الـ label هنا أضفنا الـ frame.add(plus_button); // frame في الـ plus_button هنا أضفنا الـ frame.setSize(300, 80); // هنا قمنا بتحديد حجم النافذة. عرضها 300 و طولها 80 frame.setDefaultCloseOperation(JFrame.EXIT_ON_CLOSE); // هنا جعلنا زر الخروج من النافذة يغلق البرنامج frame.setLayout(new FlowLayout()); // حتى نجعل الأشياء التي نضيفها في النافذة تترب وراء بعضها و في وسط النافذة FlowLayout إستخدمنا الـ frame.setVisible(true); // هنا جعلنا النافذة مرئية } }
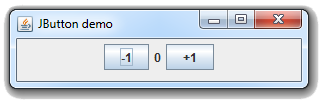
ستظهر لك النافذة التالية عند التشغيل.